


.svg)


.svg)


.gif)

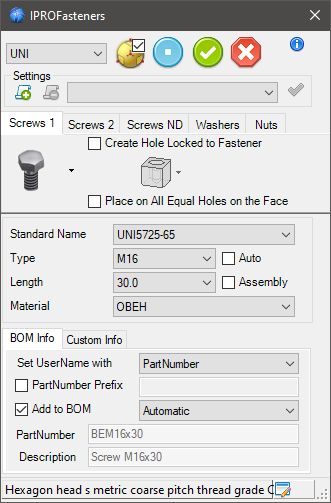
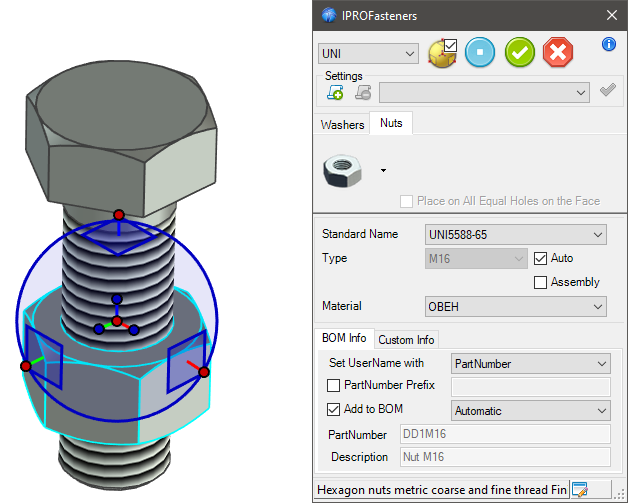
This dialog box is displayed every time you drop the IPROFastener tool in the scene or when you edit an existing component.
Description of the User Interface
At top of the dialog there are the buttons useful to control the placement of the component and a combo box used to select the Standard Rule.

- Clicking this combo box the user can select the active standard rule.
- This button is used to switch the state of TriBall. Usually, when a fastener is placed on the scene, the TriBall is switched on. In this way the user can immediately move the component in the right place. Clicking the button, the state of TriBall is toggled between on and off. The check button at the top on the right of the button controls the state of TriBall after the confirm of placement. If the button is checked and TriBall is active, TriBall will stay active, otherwise TriBall is disabled.
- This button updates the component and it confirms the placement inside the scene.
- This button updates the component and it closes the dialog box. When the dialog is closed, the state of TriBall is controlled by the buttons described before.
- This button closes the dialog box and it terminates the command. If you haven’t confirmed the placement before, the current component will be deleted.
- This button displays a dialog box containing information about the current tool.
Settings

The items included in this box enable you to save the current setting of the component. This enables you to recall them quickly in future sessions. The buttons included in this section enable you to save, remove or apply any saved setting.
Components
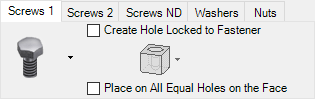
This section is composed by five tabs. These tabs enable you to select the type of component. Every tab contains a family of components. On the left side of this section there is a drop down button that is used to select the type of the component. Moving the cursor over the icons of the components, it’s displayed a tooltip which describes the component. As soon as a new component is selected, all the items in the dialog box will be updated in order to display the available standards and dimensions.
Create Hole… and Place on All… are better explained later.
Create Hole Locked to Fastener If you move the bolt, also the holes are moved, and, in this case they are no more visible. This is the standard behavior of IC-Mech, that allow you to automatically update the holes as soon as you move the screw.
In order to avoid this behavior you can do one of these operations:
- Disable the behavior in the IPROSettings: This is a general setting, and the hole will not be elaborated when you will move a screw; see Elaborate Automatic Holes
- Keep pressed the Shift key during the TriBall translation.
- Create a configuration. In a configuration the holes created by IPROFasteners are not moved. (If you want to have a configuration where the the automatic update of the holes is active start the name of the configuration with + or _ chars).
Parameters
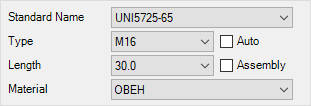
The central section of the dialog box contains the options useful to select the standard and the dimensions of the component. These parameters are: Standard Name, Component Type, Length and Material.
BOM Information
The lower section of the dialog contains the items useful to set the information related to the component. The section is divided in two parts: BOM Information and Custom Information.
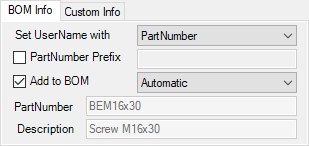
BOM Information section contains all the items useful to set PartNumber and Description of the component. The available items are:

Usually the Name of the component is the same of the PartNumber. This combo box enable you to set the Name of component as the PartNumber, Description or Don’t change.

This check button controls the enable state of the text item placed on the right. If this button is checked, any string placed in the text item will be used as prefix of the PartNumber.

This check button is used to control the “Included in the BOM” state of the component, and combo box is used to control how the PartNumber and the Description will be managed. The available options are:
- Automatic - In this case PartNumber and Descriptionare automatically generated reading the settings inthe IPRO_BOM.ini file.
- Set By User - In this case the BOM Information arefilled by the user.
- PartNumber Auto – Description by user - In this case the PartNumber is automatically generated. The Description is manually set by the user.
- PartNumber by User – Description Auto - In this casethe PartNumber is manually set by the user. The Description will be automatically generated.

These text items contain the current BOM Information. Their state depends on the selection done on the Code Generation combo box.
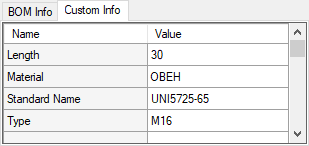
Custom Information is a collection of information that you can add to the current component. When you click on the Custom Info tab, it is displayed a two column grid that enable you to see and to set information associated to the component.
Customizing the IPRO_BOM.ini it’s possible to create custom information automatically.
Status bar

The status bar reports the description of the selected standard rule. If you click on description Library Data Manager starts to modify the description and the rules to create the bill of materials. Close to it, on the right, there is a button that enable you to edit the geometric data file, launching the Library Data Manager - Geometry…
Create Hole Locked to Fastener
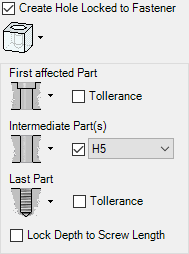
Screws and Bolts components have a drop down section that enables you to set the properties of the holes associated to the element. In fact IPROFasteners can automatically create and associate holes to any screws or bolts placed in the scene. These are the items and the options available in this section: img Hole img Options
- First Affected Part - This option is usedto define the parameters of the automatic holeapplied to the first part. Setting the dropdownbutton1 you can select the type of the hole. It’spossible to set a tollerance for the hole.
- Intermediate Part(s) - This option is used to definethe type of hole to apply to all parts placed in themiddle. It’s possible to set a tollerance for theholes.
- Last Part - This option is used to define the type ofhole to apply to the last part that has aninterference with the current component. It’spossible to set a tollerance for the hole.
- Look depth to Screw Length - When this option isactive, the length of the first hole is the same ofthe length of the component.

It’s important to note that all the automatic holes are associated to the current bolt or screw. So, if you change the dimension or the length of the component, the holes are updated in order to be compliant with the changes. Furthermore, if you copy or move the component using TriBall, also the associated holes are moved or copied.
Place on All Equal Holes of the Face
If there are holes on the part on which the screw is dropped, and if it drop the screw on the edge of a hole, the “Place on All Equal Holes of the Face” check box is displayed, which if activated will automatically place a screw for each hole equal to the one selected.
Placement of Associated Fasteners
The IPROFasteners has some useful behaviors which improve your productivity. In fact when you drop the tool over an existing component, IPROFasteners automatically gets the existing parameters and associate the new component to the existing one. For example, if you drop the tool on the leg of an existing M10 screw, the dialog box will propose you to place a washer or a nut related to the M10 dimension. Furthermore, if you edit the screw (or the nut), the other component will be modified according to the new selected dimension.
If the selected dimension doesn’t exist for that component, it will be suppressed. For example if you change the dimension of the screw from M10 to M18, and the nut of M18 is not available in the data file, it is not changed but it is suppressed.
Edit of Screw or Bolt length
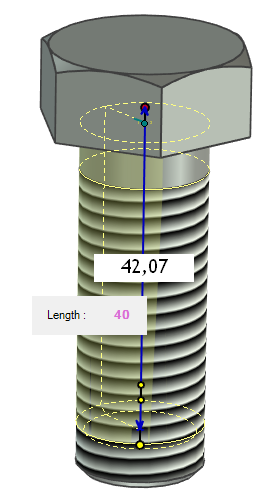
You can change the length of the screws (or bolts) editing the component with a double click. Anyway if you select the IShape leg of the component, you can change it dragging the handle in the desired position. IPROFasteners automatically elaborates the new requested length and it sets the length to the closest value in the data file. Furthermore all the BOM Information, Part Name and Custom Data are updated.
Luntmakargatan 34
111 37 Stockholm